INTRODUCTION
Securing a wireless router that is attached to a home or business network is the first and most important thing anyone can do to protect data traveling through the internet. This data can range from proprietary information to financial accounts and even personal data. This tutorial will highlight the seven steps that are necessary to secure a wireless router.
By 2011, the estimated total cost of cybercrimes was approximately $63.7 billion (n.a., 2013). By the end of this year, that number is expected to grow exponentially to $120.1 billion. Although government agencies and big business may seem like the likely targets, consider the fact that every person has an identity and financial interests. Exploitation of trade secrets and intellectual property are other likely targets for cyber crimes. A cyber criminal would be willing to infiltrate any network looking for valuable information. That is why this tutorial is vital to protecting a personal identity or business entity.
HISTORY OF DATA BREACHES

Looking at this bar graph, in the span of ten years from 2005 to 2014, data breaches have grown five-fold from 157 million known breaches to almost a staggering 800 million (Lord, 2017). Considering this increase, the need to protect data is at an all time high. As a society, we have become more and more dependent on the internet than ever before. Significant time, effort and money it would be lost as a result of information was compromised. Many of these breaches can be avoided by proper setup and configuration of a wireless router.
WHERE BREACHES OCCUR
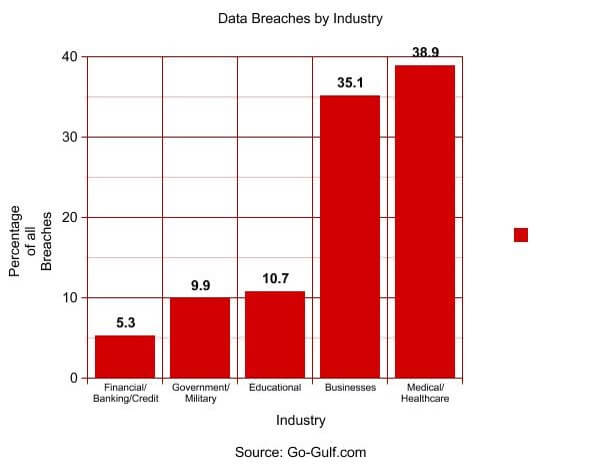
This graph that was compiled by data taken from Go-Gulf.com, shows that most major industries that hold onto personal data and records have some of the highest number of breaches. Although financial institutions are lowest on this list, the number of breaches is relevant to the total amount of money stolen over the internet. Medical records are the largest breach of privacy according to the graph and not only results in information being compromised, but it can be altered in a way that could lead to incorrect diagnoses or even the incorrect medications. Having a secure wireless router will minimize the likelihood such breaches and keep personal information safe and out of the hands of cyber criminals.
PROCESS OUTLINE
- Step 1 – Router hardware setup
- Step 2 – Creating a unique router name
- Step 3 – Creating a password
- Step 4 – Disable remote administration
- Step 5 – Enable the firewall
- Step 6 – Media Access Control (MAC) address filtering
- Step 7 – Save Configuration and Test
These steps are not only an advantage to businesses, but anyone who has a small Local Area Network (LAN) within a home. With as much personal and financial and data available on the internet, any breach could be devastating and in some cases irreversible.
ITEMS USED IN THIS TUTORIAL
- Wireless router (in this case a Linksys E2500 router was used)
- Two cat-5 cables
- Internet Service Provider (ISP) modem
- Computer/Laptop
In order to successfully fulfill the steps in this tutorial, the items needed are a wireless router, two cat-5 cables, the modem from an Internet Service Provider (ISP) and a laptop or desktop computer that will be primarily used. Upon purchasing the wireless router, the cat-5 cables come in the box. If only one is included, a second one can be purchased and only needs to be approximately 5 feet in length.
STEP 1 – ROUTER HARDWARE SETUP
Once all of the items are obtained, the first step is to attach all the components together in the necessary order. Plug the cat-5 cable into the internet port on the back of the router and plug the other end into the modem provided by the ISP. Take the second cat-5 cable and plug one end into the first port of the router and the other end into the Ethernet port (which looks like a telephone jack) of the laptop or desktop. Give the cables a slight pull to make sure they are locked in place. Plug the power adapter into the wireless router and then power on the computer. The first step is completed.
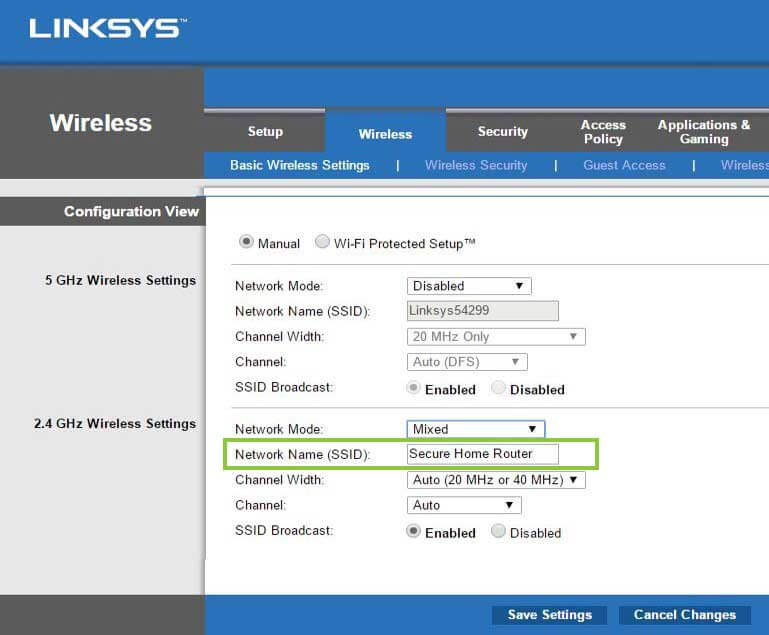
STEP 2 – CREATING A UNIQUE ROUTER NAME
*For the following steps, you’ll want to consult the User Manual or Manufacturer webpage to obtain the default IP and admin credentials for your router.
The second step to securing a wireless router involves logging in to the router itself and changing the SSID, or Service Set Identifier. This gives the wireless router a unique name so it is easily identifiable by the owner or anyone else that is permitted to log in.
To log into the router, open up a web browser (in this case, Google Chrome) and type the router’s IP address into the address bar and hit enter (the default address for our Linksys E2500 Router is 192.168.1.1). Next, the login screen will open up and allow for login credentials. The default username and password are set as admin. Once logged in, navigate to the wireless tab and the basic wireless settings to change the router’s name, or SSID. This can be any name.
Once the SSID is created, save the configured settings by clicking the save button. Proceed to the next step.
STEP 3 – CREATING A UNIQUE PASSPHRASE
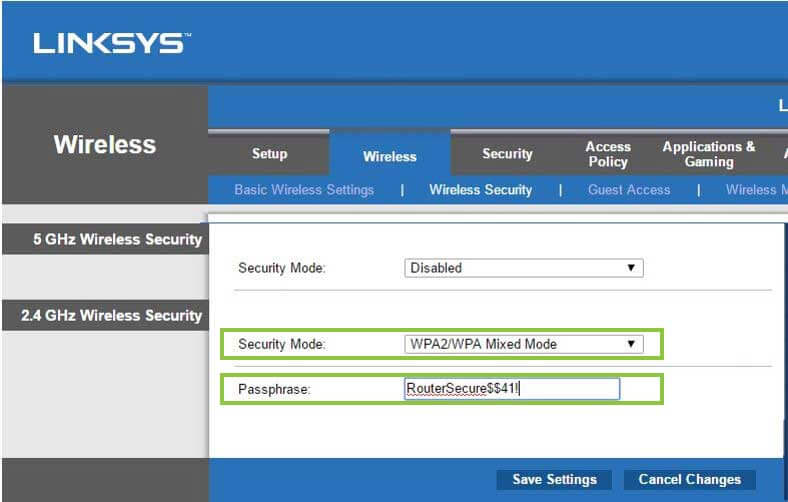
Having created a unique SSID, step 3 is to create a password. Most routers, including this one, have both 5GHz and 2.4 GHz wireless signal strength. For this tutorial, focus on setting the 2.4 GHz frequency as that is the more stable of the two wireless signals. A 5GHz signal is stronger and can travel a further distance, however, it has far less capability to travel through walls and metallic surfaces such as heating ducts (Mitchell, 2016). This greatly impacts network speeds and performance, therefore, it is best to disable this frequency unless you plan to use the wireless internet in the room that the router is located.
To create a passphrase (password), go to the Wireless tab and then the Wireless Security sub tab. The most secure mode for in home and small business wireless routing is Wi-Fi Protected Access 2 / Wi-Fi Protected Access mixed mode. Select this mode and enter a passphrase. We recommend at your password be at least 8 characters long, have at least 1 uppercase letter, 1 number and 1 special character. However, it has also been recommended to use a password that is a phrase, easy to remember, and is 10 characters or longer (Hansen, 2017).
STEP 4 – DISABLE REMOTE MANAGEMENT
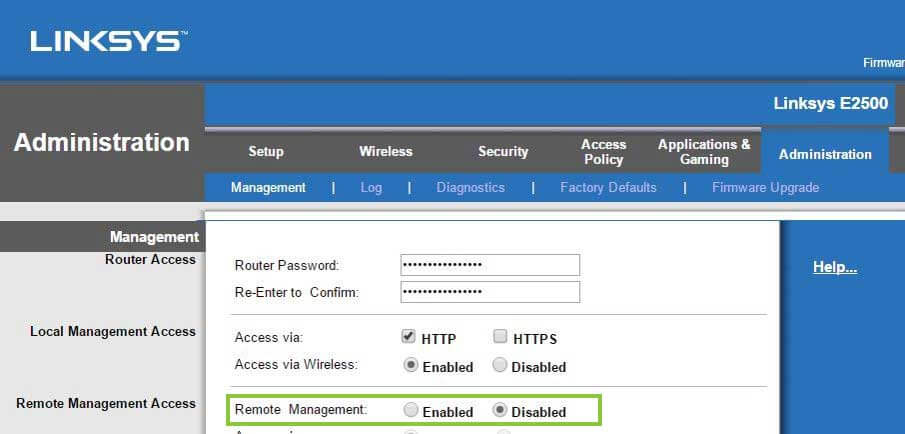
Step 4 is to disable remote management. Remote administration means that anyone that connects to the router wirelessly can access these configuration settings and potentially change them. To change this, navigate to the management sub-tab and click on disable remote management. Save the settings and move to the next step.
STEP 5 – ENABLE THE FIREWALL
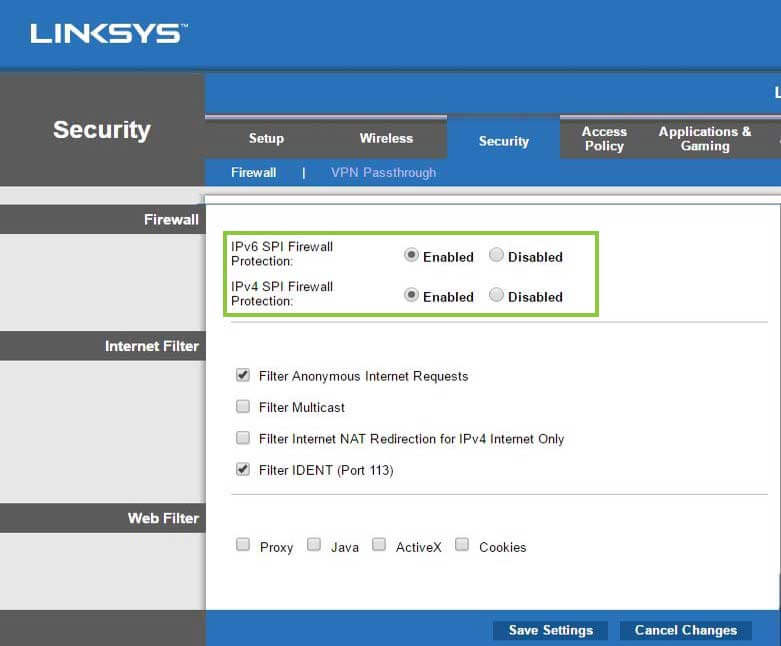
A firewall is a barrier that is designed to keep outside forces from accessing the data with the intention to destroy it (Tyson, 2000). Click on the Security tab and then the Firewall sub-tab. Make sure both IPv4 and IPv6 firewalls are enabled. IPv6 is the newest protocol as each device connected to the net requires an address. Since IPv4 addresses are becoming scarce, service providers are assigning IPv6 addresses. This will cover both cases. Make sure that the filter anonymous requests and IDENT buttons are checked. These prevent third parties from creating requests to your computer in order to release information.
STEP 6 – MEDIA ACCESS CONTROL (MAC) ADDRESS FILTERING
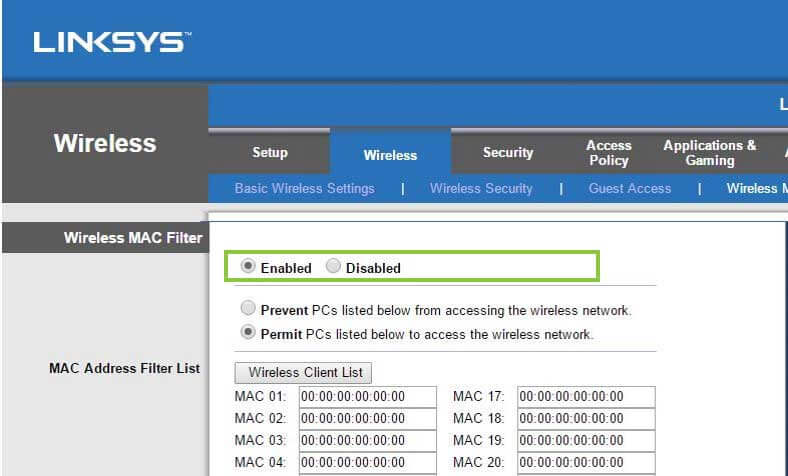
MAC addresses are those that give a computer component a unique ID (Rouse, 2005). The IP address that is used to connect to the internet is directly tied to the MAC address. It is also known as a physical address.
In this step, enable MAC filtering and then choose the tab that states “permit the PC to allow access to the router.” Underneath, enter in the MAC address and save the settings.
In simple terms, this setting will only allow the MAC address entered to access the router and internet. Additional MAC addresses can be added that need to be connected to the network.
If there is an issue finding the MAC address to the Ethernet card, navigate to the troubleshooting slide of this tutorial and follow instructions on how to locate it.
Save the settings and go to the final step.
STEP 7 – SAVE THE CONFIGURATION AND TESTING
The final step is to save the overall configuration. Navigate back to the main screen. This is located under the setup tab. Once there, click the save settings button one last time and that completes the configuration. The router should automatically reset with the new settings. Close the web browser.
The best way to test the configuration is to log in to the wireless router with the laptop computer. Remember to click on the name that was created for the router and insert the password that was created in step 3.
TROUBLESHOOTING
Some issues that could arise include not knowing how to find a MAC address or accidentally configuring the wrong setting. To check your MAC address, open up the command prompt line in Windows using cmd in the search bar. Type in ipconfig /all and scroll down to Physical Address. This is the same as the MAC address. The same steps can be taken to identify other devices that are requesting permission to access the network. This is a good way to ensure that only devices that you authorize are allowed to connect to your router.
If an incorrect configuration is made in the router, it is simple to go back to the appropriate tab(s) and enter in the correct information. If the correction can’t be done, simply locate the reset button on your wireless router. Press this with a pen tip and hold it until all the green lights on the back begin to blink off and on continuously. Let it sit for a minute while the default settings are re-written and then return to step 2.
CONCLUSION
This tutorial discussed setting up a wireless router as well as some statistical data to show which information is most vulnerable. As society continues to become more and more dependent on the internet, so too does the amount of proprietary data. The costs of a breach in data continue to increase and will grow exponentially in the near future.
These breaches can be reduced significantly by following the 7 steps outlined in this tutorial. These steps are simple to perform and anyone, including a novice user, can follow them to secure a network.
Make sure to complete these steps immediately. The longer the wait, the longer that your data will be unsecured with the opportunity for cyber criminals to steal it. This will save anyone a great deal of time and money in the long run.
REFERENCES
- Hansen, G. (2017). 6 Tips on How To Make Your Wireless Networks Unbreakable. Retrieved March 6, 2017
- Lord, N. (27 January, 2017). The history of data breaches. DataInsider.com. Retrieved March 3, 2017
- Mitchell, B. (16 October 2016). Is 5GHz Wi-Fi Better than 2.4 GHz? Retrieved March 5, 2017
- N.A. (17 May 2013). Cyber crime statistics and trends (info graphic). Retrieved March 5, 2017
- NCES. (2017). Create a graph. Retrieved March 3, 2017
- Rouse, M. (September 2005). MAC address (Media Access Control address). Retrieved March 5, 2017
- Tyson, J. (24 October 2000). How firewalls work. Retrieved March 5, 2017